
Google Analytics, the ubiquitous digital analytics solution pairs well with the king of Single Page Applications, React JS. Follow this guide to fully integrate Google Analytics and Google Tag Manager into a React app. We will cover the code needed for the React app as well as how to set up Google Tag Manager triggers, variables, and tags.
Terminology
- SPA – Single Page Application
- React – React JS for building SPAs
- GA – Google Analytics, now Google Universal Analytics a.k.a. “GUA”
- GTM – Google Tag Manager
GTM Container Code
The first step is to add the GTM container to the React app. The GTM container code can either be added directly to your index.html or via a package.
Method 1 (preferred): Add GTM Container Code via Package
For this method we will need a handy package, react-gtm-module. Start by installing the package.
npm i react-gtm-moduleTo initialize GTM with this method, we need to include the package in our app.js and provide a GTM ID. Remember to swap in your own gtmId.
import TagManager from 'react-gtm-module'

const tagManagerArgs = {
  gtmId: '<YOUR GTM ID>'
}

TagManager.initialize(tagManagerArgs)
Method 2: Add GTM Container Code via Index.html
The index.html can be found at projectName/public/index.html within your working directory.
If you don’t already have the code then you can copy it from the Admin > Install Google Tag Manager section in GTM. You will need GTM admin access to get it or you can ask your GTM admin to get the code for you. Then we simply follow the instructions provided by Google:
Paste this code as high in the <head> of the page as possible:
<!-- Google Tag Manager -->
<script>(function(w,d,s,l,i){w[l]=w[l]||[];w[l].push({'gtm.start':
new Date().getTime(),event:'gtm.js'});var f=d.getElementsByTagName(s)[0],
j=d.createElement(s),dl=l!='dataLayer'?'&l='+l:'';j.async=true;j.src=
'https://www.googletagmanager.com/gtm.js?id='+i+dl;f.parentNode.insertBefore(j,f);
})(window,document,'script','dataLayer','<YOUR GTM ID>');</script>
<!-- End Google Tag Manager -->
Additionally, paste this code immediately after the opening <body> tag:
<!-- Google Tag Manager (noscript) -->
<noscript><iframe src="https://www.googletagmanager.com/ns.html?id=<YOUR GTM ID>"
height="0" width="0" style="display:none;visibility:hidden"></iframe></noscript>
<!-- End Google Tag Manager (noscript) -->
In a pinch, you can take my code snippets above and swap out “<YOUR GTM ID>” for your own GTM ID.
Once complete, your index.html should look something like this.
<!DOCTYPE html>
<html lang="en">
  <head>
    <meta charset="utf-8" />
    <link rel="icon" href="%PUBLIC_URL%/favicon.ico" />
    <meta name="viewport" content="width=device-width, initial-scale=1" />
    <meta name="theme-color" content="#000000" />
    <meta
      name="description"
      content="Web site created using create-react-app"
    />
    <link rel="apple-touch-icon" href="%PUBLIC_URL%/logo192.png" />
    <link rel="manifest" href="%PUBLIC_URL%/manifest.json" />
    <title>React App</title>
    <!-- Google Tag Manager -->
    <script>(function(w,d,s,l,i){w[l]=w[l]||[];w[l].push({'gtm.start':
    new Date().getTime(),event:'gtm.js'});var f=d.getElementsByTagName(s)[0],
    j=d.createElement(s),dl=l!='dataLayer'?'&l='+l:'';j.async=true;j.src=
    'https://www.googletagmanager.com/gtm.js?id='+i+dl;f.parentNode.insertBefore(j,f);
    })(window,document,'script','dataLayer','<YOUR GTM ID>');</script>
    <!-- End Google Tag Manager -->
  </head>
  <body>
    <!-- Google Tag Manager (noscript) -->
    <noscript><iframe src="https://www.googletagmanager.com/ns.html?id=<YOUR GTM ID>"
    height="0" width="0" style="display:none;visibility:hidden"></iframe></noscript>
    <!-- End Google Tag Manager (noscript) -->
    <noscript>You need to enable JavaScript to run this app.</noscript>
    <div id="root"></div>
  </body>
</html>
Validate GTM Container Implementation
We can run a quick test in dev tools to check if the container code is coming in okay. Open up dev tools and look for gtm.js.
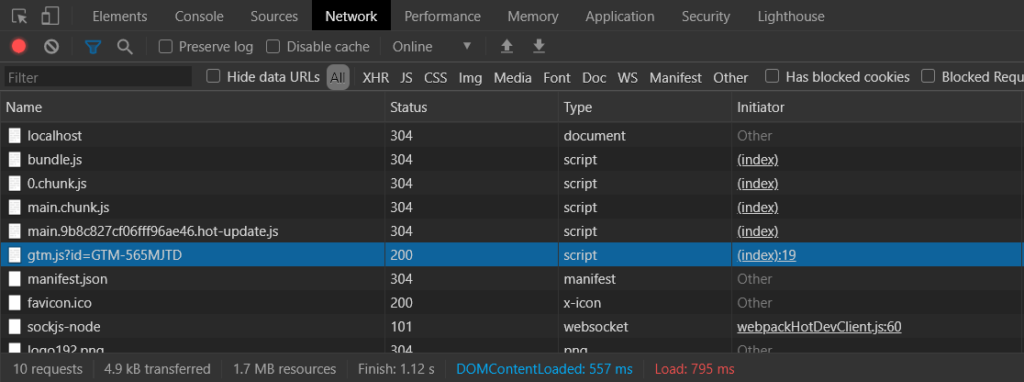
If at this point you are getting a 404 from gtm.js, double-check your GTM ID and make sure that you have published at least once. A new container will return a 404 if the container has never been published.
Page Tracking
Method 1: With routing and <head> management
This method assumes that you use something like react-router-dom and react-helmet-async, which means that your page URL and page titles are being updated between components. Other routers and <head> management packages will work here as well.
To signal to DTM that we would like to track a new page we can use an event like this:
window.dataLayer.push({
  event: 'pageview'
});
For example, your App.js might look like this:
import React from 'react';
import TagManager from 'react-gtm-module'

const tagManagerArgs = {
  gtmId: '<YOUR GTM ID>'
}

TagManager.initialize(tagManagerArgs)

function App() {
  window.dataLayer.push({
    event: 'pageview'
  });
  return (
    <div className="App">
      <header className="App-header">
        <p>
          Analyst Admin
        </p>
          Learn React
      </header>
    </div>
  );
}

export default App;
Method 2: Without routing and <head> management
This method is very similar to the first, the only difference is that you can pass the page URL and Title that you want.
window.dataLayer.push({
  event: 'pageview',
  page: {
    url: location,
    title: title
  }
});
Variables
url – The URL of the page that you wish to track. In a later step, we will set this up to go into the “location” custom field of the GA tag, which will in turn put it into the “dl” query parameter. I recommend putting in a full URL so that it matches the non-SPA page tracking. Google uses the following formula to get the URL: document.location.origin + document.location.pathname + document.location.search. GA documentation.
title – The title of the page. In a later step, we will set this up to go into the “title” custom field of the GA tag, which will in turn put it into the “dt” query parameter. GA documentation.
Page Tracking Validation
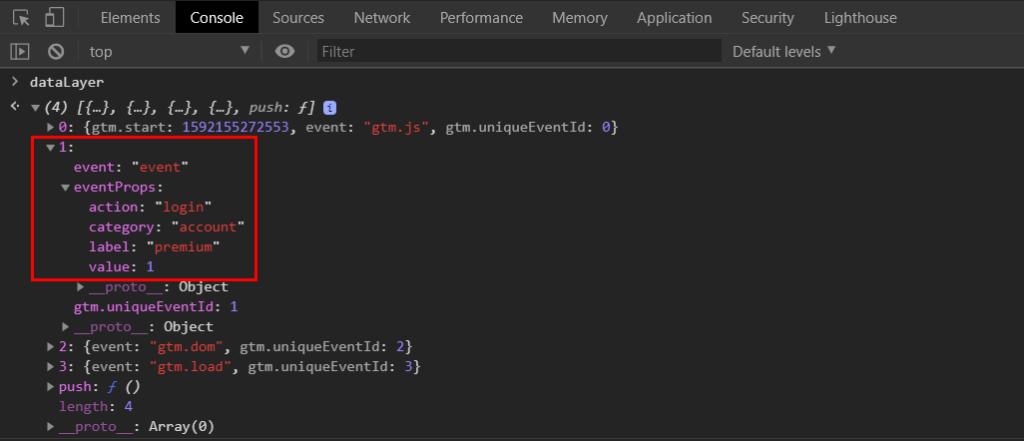
Set up page tracking with either of the two methods above and load a test page. In the console, search for the global dataLayer variable and expand the array. You should see an element for “pageview”.
If you don’t see the “pageview” element – check that you are inserting the “pageview” element into window.dataLayer and that your data layer name matches across your code.
Event Tracking
In GA event tracking, we work with four variables: category, action, label, and value. You can read more about it here. To track events in React we need to push a new element into the data layer that contains the variables that we want. For example:
window.dataLayer.push({
  event: 'event',
  eventProps: {
      category: category,
      action: action,
      label: label,
      value: value
  }
});
GTM is flexible enough to allow for different key names and object structures. Additionally, GTM can transform the variables that we send in and can even fill in any gaps in data. However, to keep things simple, we’re just going to give it the variables in plain English so the mapping in GTM becomes trivial.
Event Tracking Validation
Similar to page validation, we can validate the event insertion into the data layer by checking the console.
This wraps the JavaScript side. Now we can switch over to GTM set up.
GTM Set Up
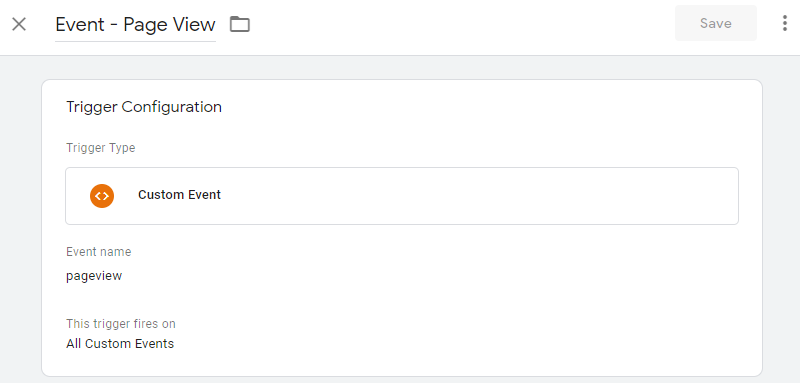
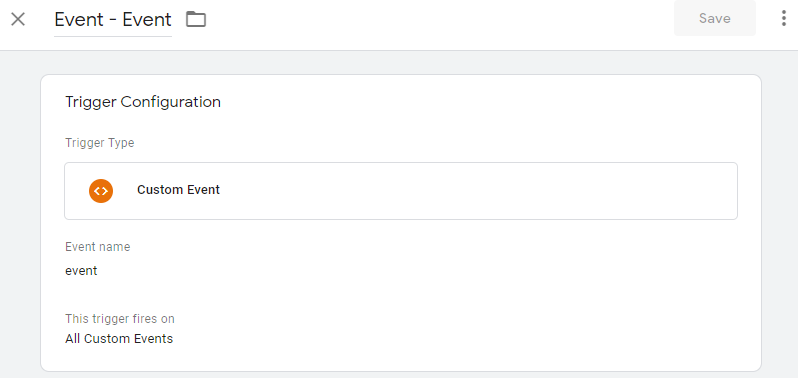
Triggers – set up the triggers which are going to listen for our events. For example event: 'pageview' and event: 'event'.
Next, set up the variables for page tracking and event tracking. The page.url will come from the page.url data layer variable as you may have guessed. We will also set a default value in case that page.url is not sent in with the dataLayer.push event.
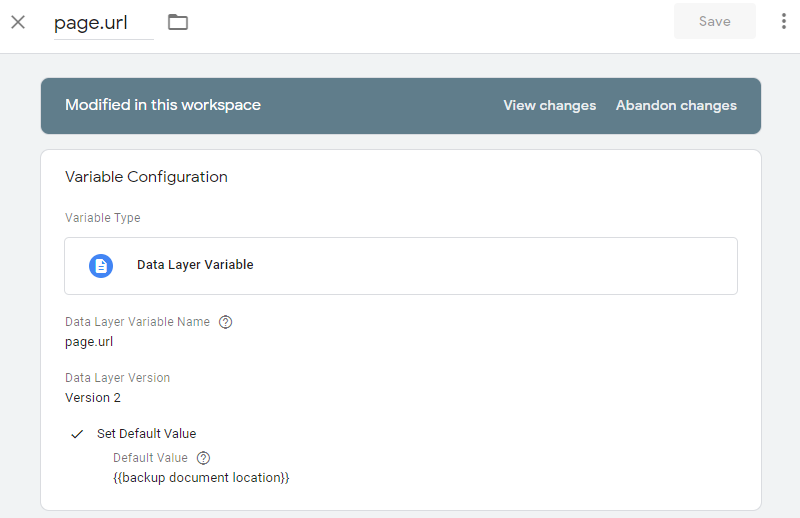
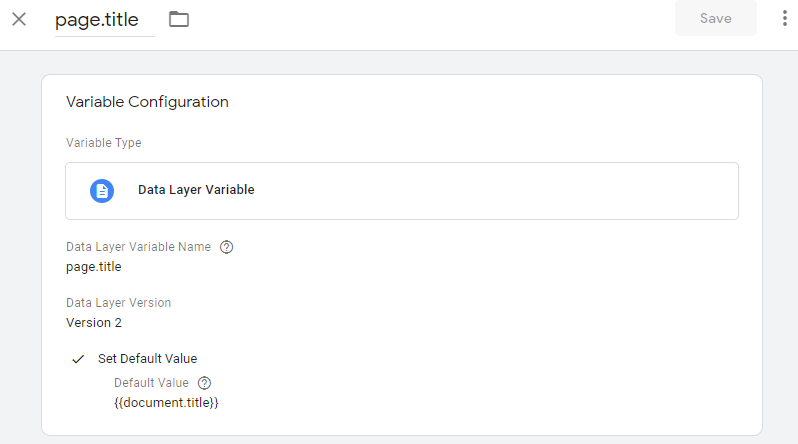
Similar to page.url, we will also need a page.title variable and set a default value for it.
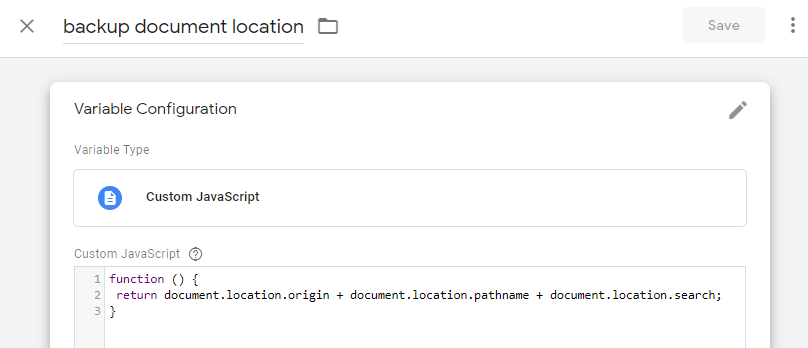
If you use a Router with your react app then the URL will be updated automatically, in this case you don’t need to send in page.url. Instead, we can have GTM pull the URL. You can use the code below to manually get the URL that the GA library would normally get.
function () {
 return document.location.origin + document.location.pathname + document.location.search;
}
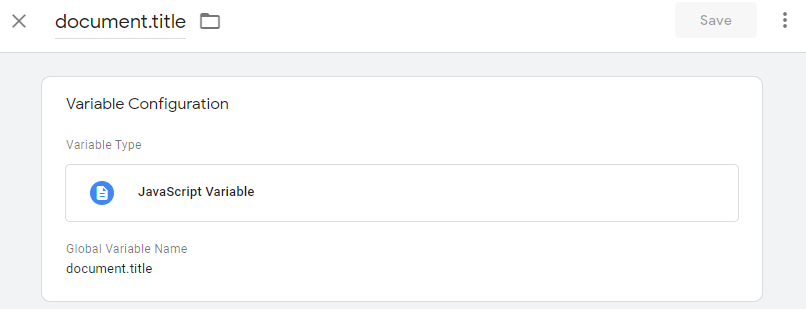
We can use a similar approach to get the document.title if the page.title variable is not sent in with dataLayer.push.
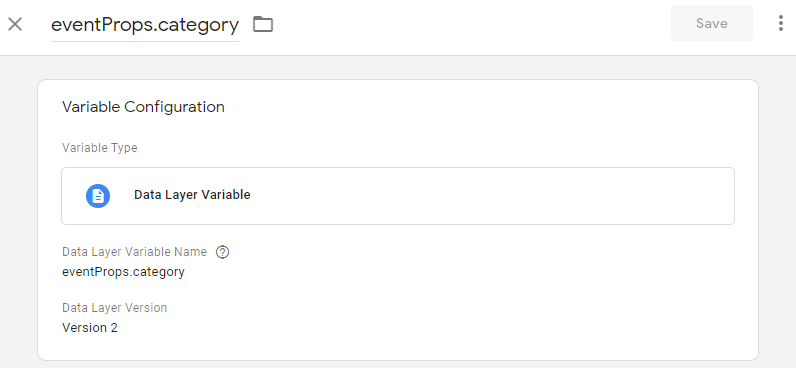
The final four variables to set up are for event tracking. I’ve only included category below. However, you will need to create variables for all four: category, action, label, and value.
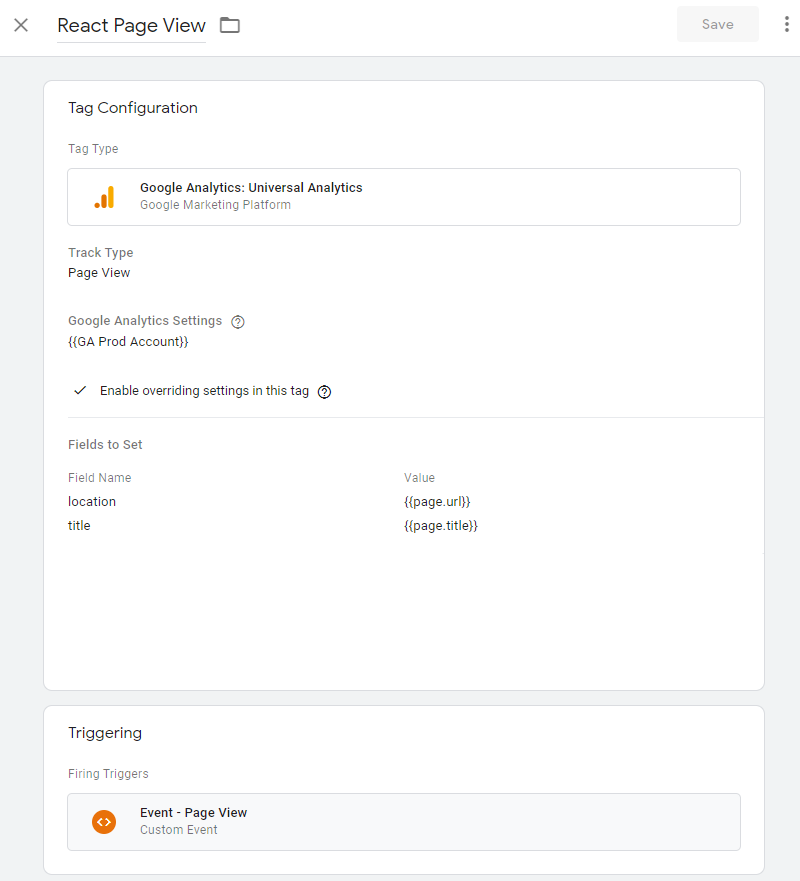
The last part of the GTM set up is setting up the tags. You will need to check off “Enable overriding settings in this tag” to get access to Fields to Set. Then set location and title as shown below. Also, please note that the trigger is the event page view that we created earlier – that way the tag doesn’t fire on page load, only when an event is pushed into the data layer.
Set up the Event Tracking tag similarly to the Page View Tag:
Final Validation
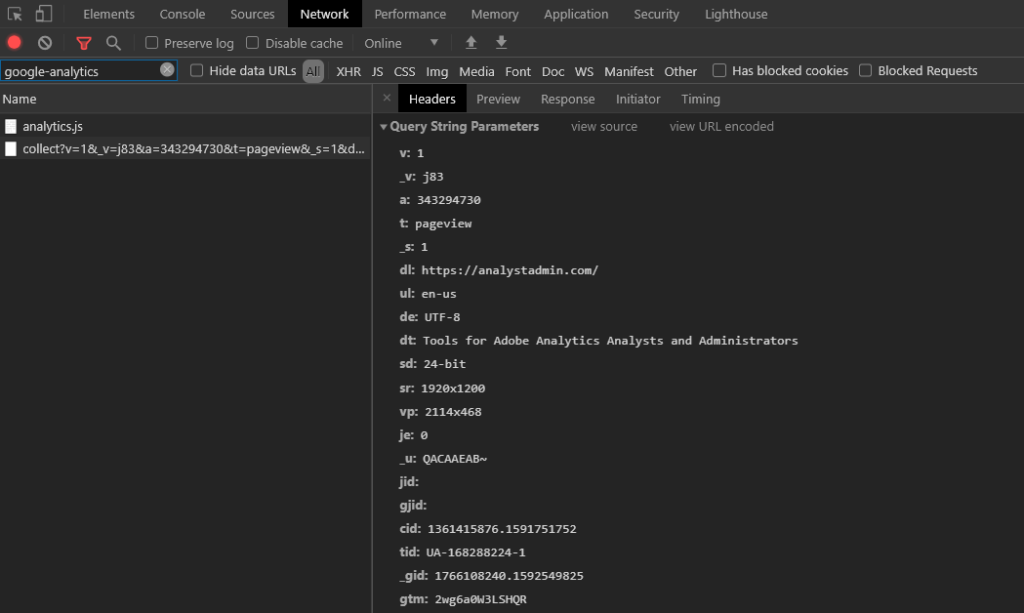
To check for proper page tracking on the browser, open up dev tools, search networks requests for “google-analytics” and click on the /collect request.
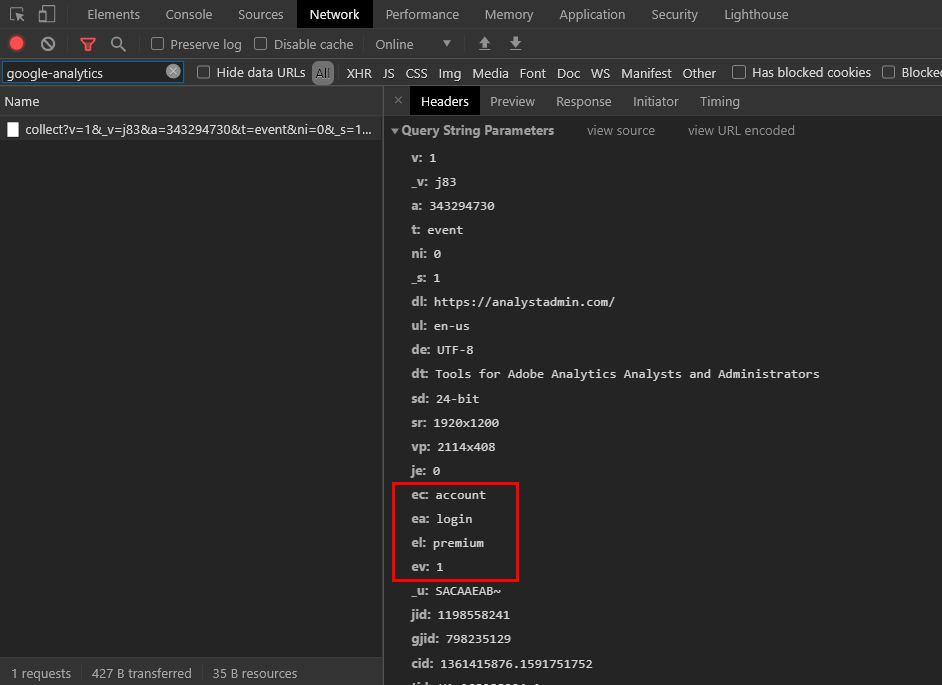
For event tracking validation, trigger your event and look for the event analytics HTTP request.
That’s it! You should have a basic, but fully functional GA+GTM implementation on your React App. Let me know in the comments if you have any questions, comments, or suggestions.
Hi Miguel,
Many thanks for your article. This is one of the most easy-to-follow articles I have found about GTG+GA+Reactjs setup
However, instead of manually triggering page view events we can use History change trigger in GTM
Hi Vadim,
Yes! Thank you.
That’s a great tip – I’ll try it out next time I add a page to the SPA.